
Spam is a problem that is as old as the internet itself. If you have a site with any kind of form or comment section you have likely encountered spam. Comment forms, contact forms, MailChimp signups, it doesn’t matter, spam is a genie that will never go back into its bottle.
One company that has been bravely battling spam since 2005 is Akismet, they are as near as you can come to the gold standard. Their WordPress integrations are used millions of times per day. If you are using any WordPress form plugin there is very likely an Akismet integration built in.
What if you want to leverage Akismet’s power, but aren’t using WordPress? Or what is you are using a custom form because you don’t want to load an entire plugin just to collect MailChimp signups? Luckily Akismet has a very easy to use and robust API. We are going to walk through the steps to create a custom spam filtering action with the Akismet API and use Zapier to make the API integration much easier.
Why Zapier?
We have been using Zapier to route form submissions from our site as well as client sites for awhile now. The main way we use Zapier is to do the heavy lifting of linking together different API services.
What used to mean managing servers, worrying about uptime, writing the same boilerplate code over and over in different languages and services is now managed in a unified account with an excellent user interface. No coding is necessary to use Zapier, but having that knowledge will help you appreciate how much is getting abstracted away.
The Plan
We can use Zapier to receive arbitrary data from anywhere with the Webhooks action. This is similar to creating your own personal custom API endpoint. From here we can trigger another action which can [send/get?] the data to Gmail, a spreadsheet, Slack, your CRM, or any of the other hundreds of Zapier integrations.

If we are sending data from any sort of form, we want to cut down on the spam before we start blowing up our own inboxes. So let’s add a new step that takes the form data, and submits it to the Akismet API endpoint to classify the submission as either Spam or legitimate. The first step is to get a developer API key from Akismet.
Once you get a key, you need to verify the key. This is something I have not seen with other APIs, but it is a simple step and only needs to be done once before you start checking for SPAM. You can actually accomplish this in Zapier by using the POST action and testing the data.
Create a new step, the App should be Webhooks by Zapier, and the Action should be POST.

In the customize request section, fill in “https://rest.akismet.com/1.1/verify-key” for the url, change the payload type to “Form” and put your API key and blog url into the the data field:

Continue to the “Send Data” step in order to send the request. If it all goes according to plan, the response from Akismet should proclaim your key to be “valid”.

We will modify the POST step to use the now validated key, which becomes part of the endpoint to check for spam.
According to the Akismet documentation we need to send a few fields to the comment check endpoint and it will return either “true” if they determine that this looks like spam, or “false” if they determine it is legitimate.
The URL becomes https://k3yg035h343k.rest.akismet.com/1.1/comment-check, and we will pass data for the fields “blog”, “comment_type”, “user_ip”, “comment_content”, “comment_author”, “comment_author_email”. Additional fields can be passed in, and in general it seems the more information you can give to Akismet, the better their classification will be.
Since we are building a filter for contact form submissions, the “Comment Type” we will use is “contact-form”, but there are other options such as “comment”, “reply”, “signup”, and “message” that might be useful for other filtering purposes. Refer to the documentation for more details on allowed fields and different“Comment Type” values.

To make use of the response from Akismet, we will create a new step after the POST, and the App will be “Filter by Zapier”.

The key here is to set the filter to “Only continue if….” the results from the POST to Akismet are equal to “false”.

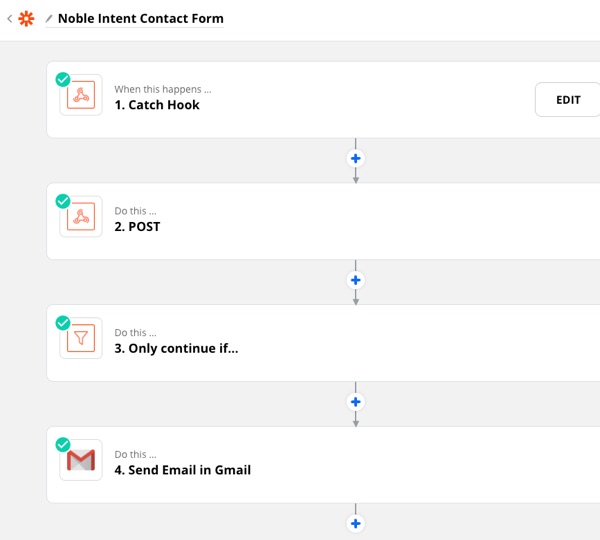
Putting it all together, we now receive data in step 1, pass the information to Akismet in step 2, decide if we have spam in step 3, and if Akismet said it is not spam, continue on to send the data from the original form to our final integration in step 4.

I have created a template based on what we use for our contact form which you can modify. It even includes the removable key validation step.

Need help setting up a custom API integration? Reach out us! One of our favorite things is to setup time saving API integrations for our clients.
Enjoyed this post? Read about how we setup a Zoom ↔ MailChimp connections for Matter Consulting.